> ## Documentation Index
> Fetch the complete documentation index at: https://tools.lunchpaillabs.com/llms.txt
> Use this file to discover all available pages before exploring further.
# Add video calls to your Bubble mobile app
> Add a video call screen, connect a Daily room, and test a call in your Bubble mobile app.
Add video calls to your Bubble mobile app with **Bundle - Daily Mobile Call**. You'll create a call screen, add a Home button to open it, and test a call with a second person.
## Video walkthrough
## Demo app and editor
* [No Code Video Chat Plus demo app](https://nocodevideochatplus.bubbleapps.io/version-test)
* [Tutorial view in the Bubble editor](https://bubble.io/page?name=native_video_call_tutorial_v3\&id=nocodevideochatplus\&tab=Design\&type=page)
The demo link opens the web app. Use the mobile editor's simulator to try the call screen.
## Before you start
You need:
* A Bubble account and mobile app.
* The [Video, Audio & Live Bundle](https://bubble.io/plugin/video-audio--live-bundle-1727441795463x240182085842370560).
* A [Daily account](https://dashboard.daily.co/). You'll create a public room below.
In Bubble, open **Plugins → Add plugins**. Search for **Video, Audio & Live Bundle** and install it.
Any native build you use must include the bundle's libraries and camera and microphone permissions. See [phone testing](#try-it-on-your-phone) for Dev build access and installation.
### Create a public Daily room
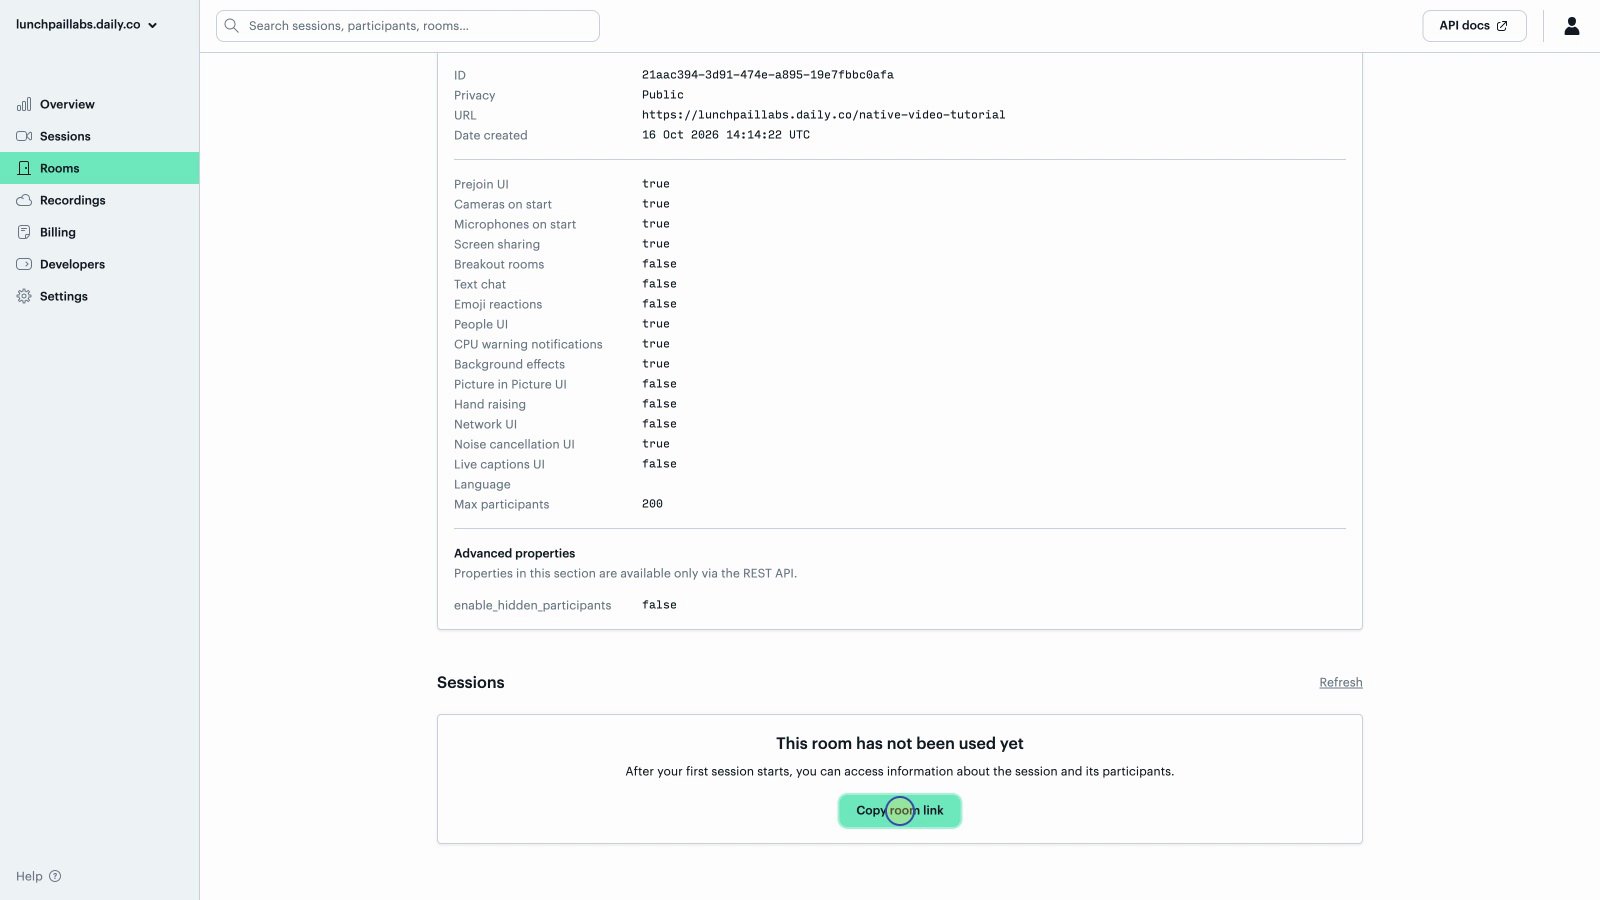
1. Open [Rooms in your Daily dashboard](https://dashboard.daily.co/rooms).
2. Choose **Create room** and enter a room name, such as `native-video-tutorial`.
3. Leave **Public: anyone with the link can join** selected.
4. Choose **Create room**. Check the name and public access in the confirmation, then choose **Create room** again.
5. Open the new room in the rooms list. Choose **Copy room link** and keep the full HTTPS URL.
Use this same URL in Bubble and for the second caller. A room URL is **not** a Daily API key. This public room does not need a meeting token.
For more help, see [Daily's room setup guide](https://docs.daily.co/guides/products/prebuilt#step-by-step-guide-embed-daily-prebuilt) or our [Daily getting-started guide](/bubble/daily/getting-started).
## Build the native call screen
### 1. Add a mobile view and call element
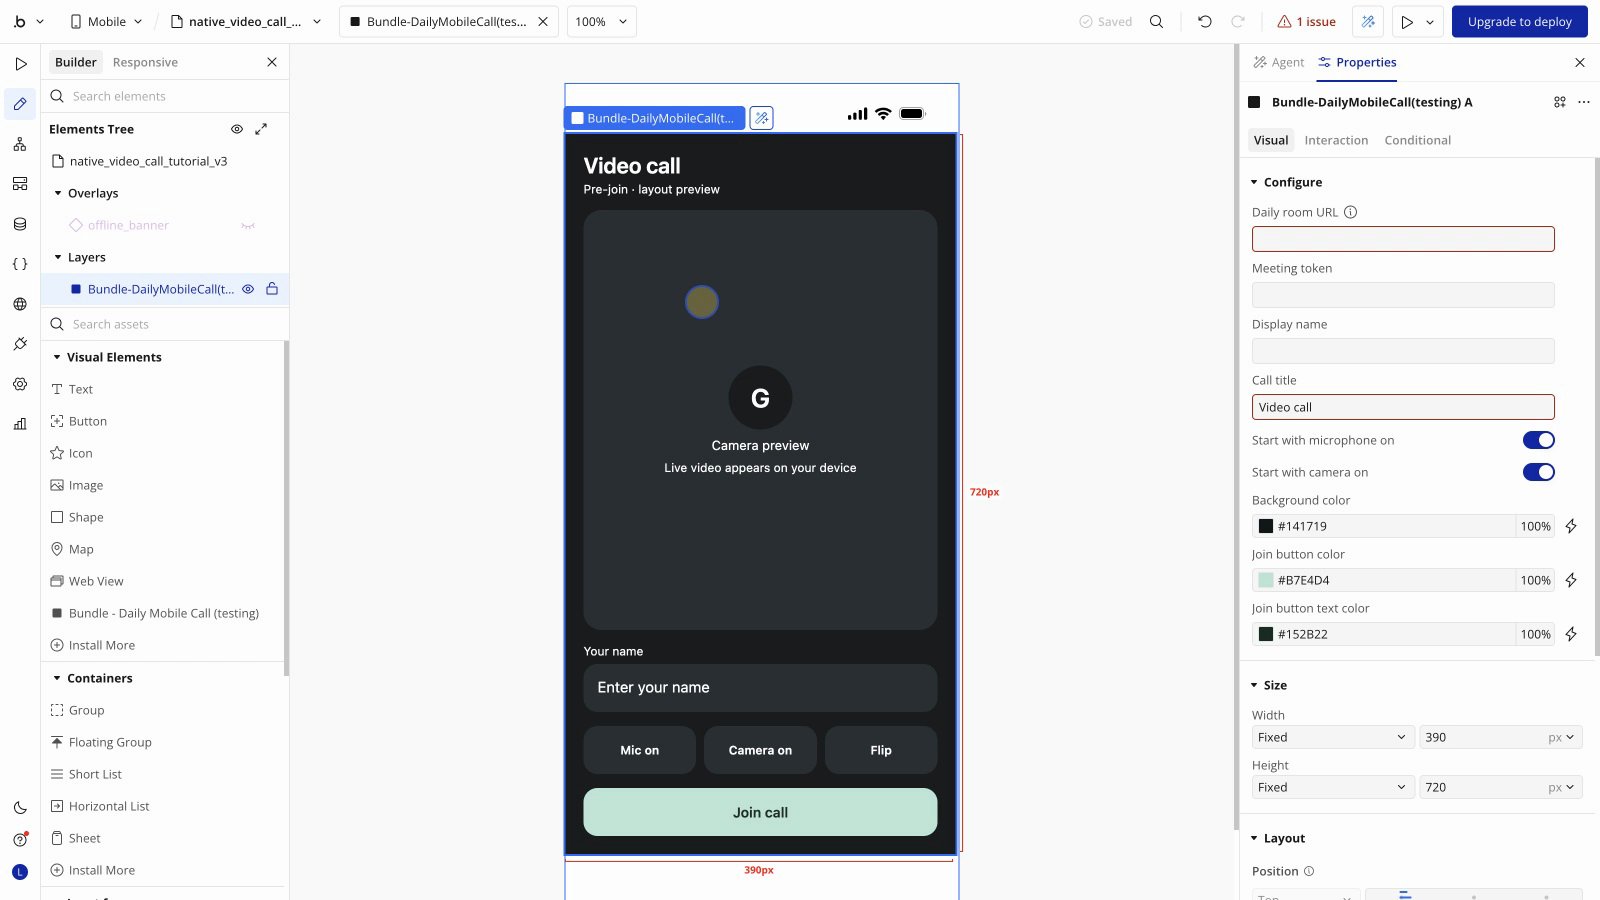
1. In Bubble's mobile Design editor, open **App Manager → Add New Interface → Mobile view**.
2. Name the view `native_video_call_tutorial_v3`.
3. Choose **Not Scrollable**, then **Create**.
4. In **Visual Elements**, choose **Bundle - Daily Mobile Call**. Click the new view to place it.
5. Select the element to open its properties.
You can use another view name. Choose that same view when you set up the Home button below.
The video uses a testing copy of the bundle. Install the public bundle linked above in your own app.
### 2. Set the element’s properties
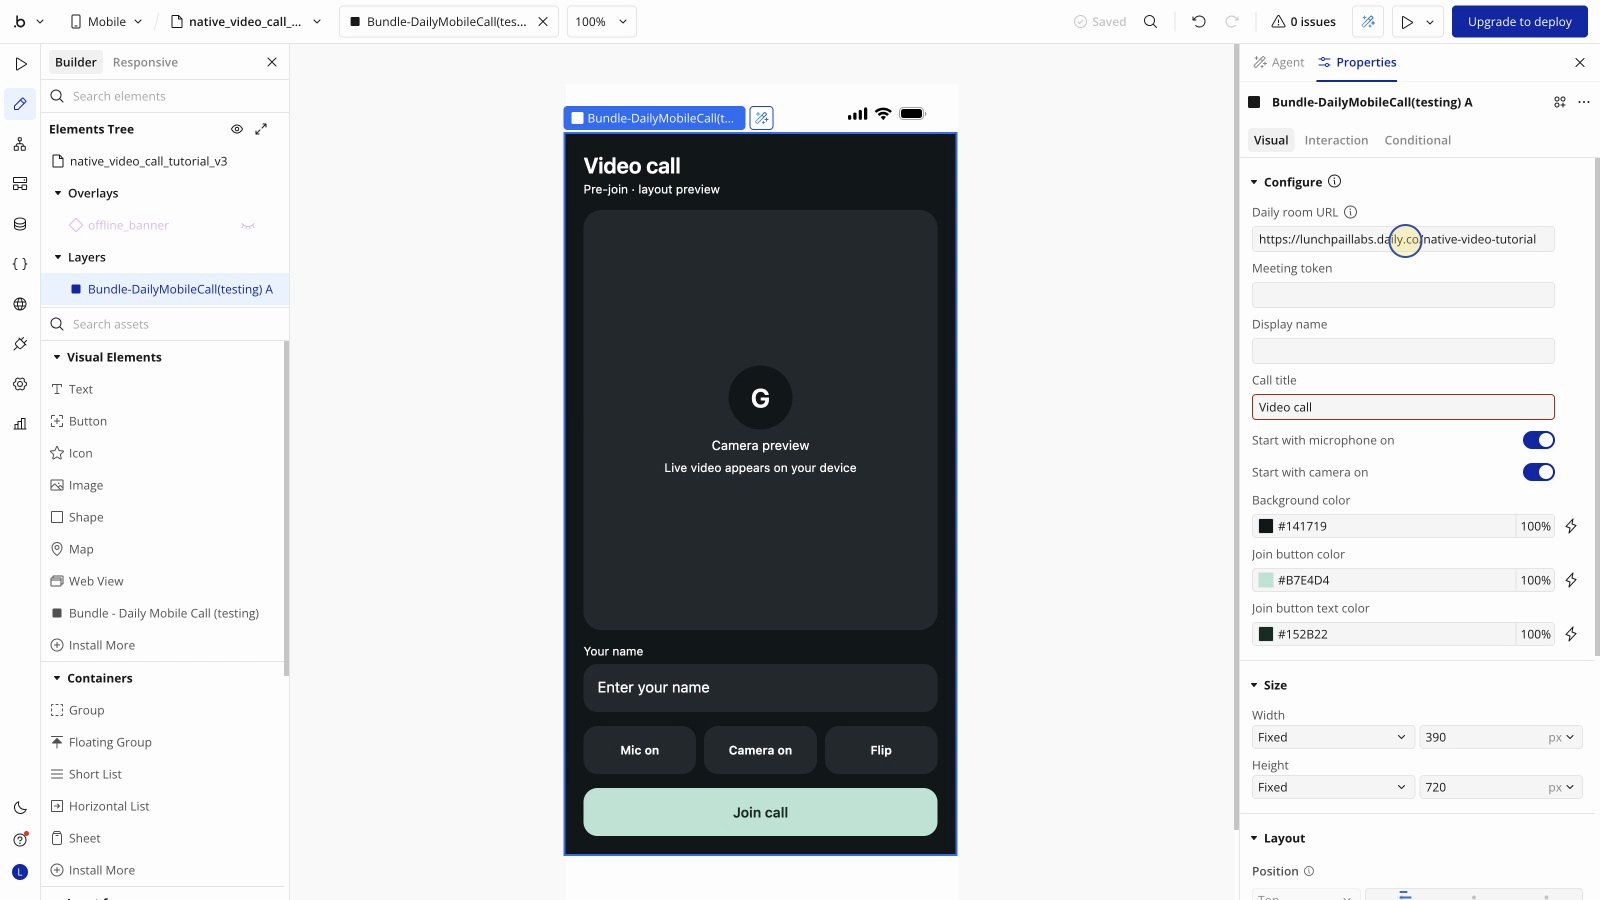
Paste the URL you copied from Daily into **Daily room URL**. Use these settings for the public room:
| Property | Example |
| - | - |
| **Daily room URL** | The full HTTPS URL of your Daily room |
| **Meeting token** | Empty for this public-room example |
| **Display name** | `Demo guest` |
| **Call title** | `Video call` |
| **Start with microphone on** | On |
| **Start with camera on** | On |
The microphone and camera switches set the starting state. People can change them during a call.
You can also set **Background color**, **Join button color** and **Join button text color**. These are optional.
### 3. Add a Home button to open the call screen
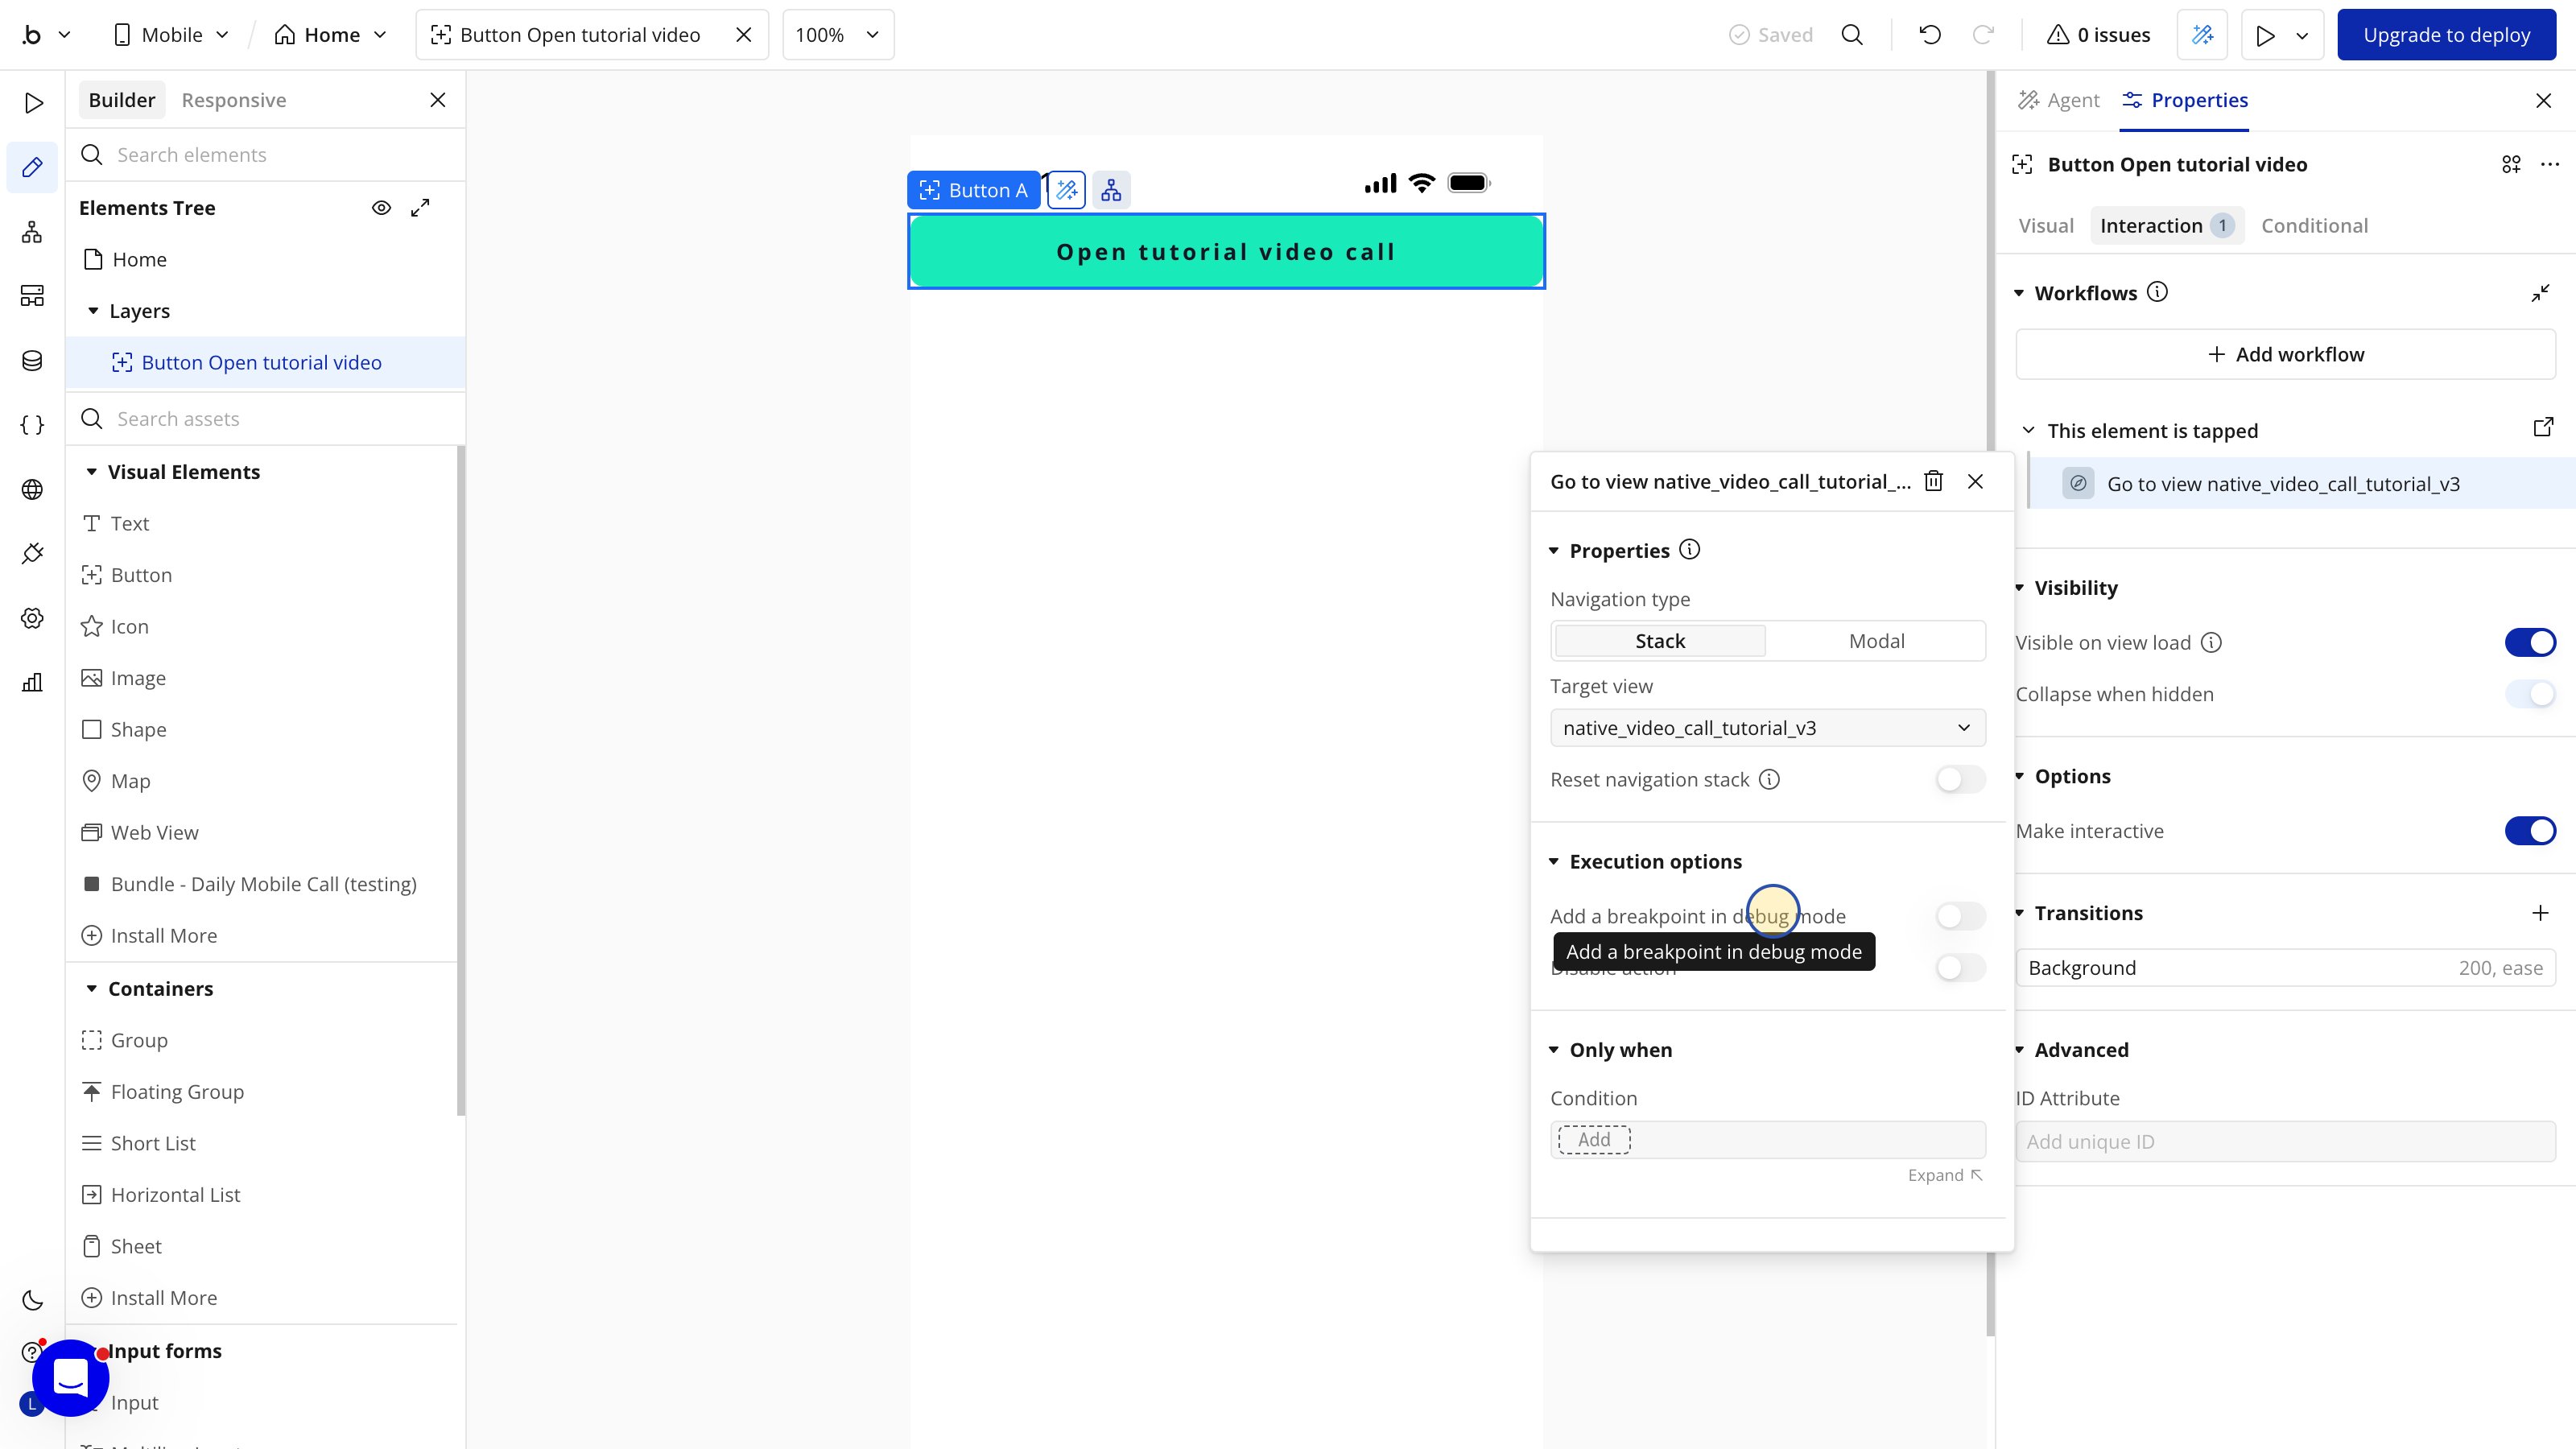
1. Open **Home** in App Manager.
2. In **Visual Elements**, choose **Button**. Click the Home view to place it.
3. Set the button's label to **Open tutorial video call**.
4. Select the button's **Interaction** tab and click **Add workflow**.
5. Bubble creates **This element is tapped** and opens the action menu. Choose **Navigation → Go to view**.
6. Keep **Navigation type** set to **Stack**. Set **Target view** to `native_video_call_tutorial_v3`, or the view you created above.
7. Leave **Reset navigation stack** off. Wait for Bubble to show **Saved**.
You should now have one button, one tap event and one **Go to view** action. The action must point to your call screen.
## Test a call in the simulator
### 1. Open the call screen
1. With **Home** open in the mobile editor, click **Preview**.
2. Select **Simulated device** and wait for it to load.
3. In the demo, tap **Tap to Start**. Sign in to Bubble if asked, then select the **test** branch.
4. On Home, tap **Open tutorial video call**. Check that your call screen opens.
Test the Home button you just built so you know its navigation works.
### 2. Check the pre-join screen
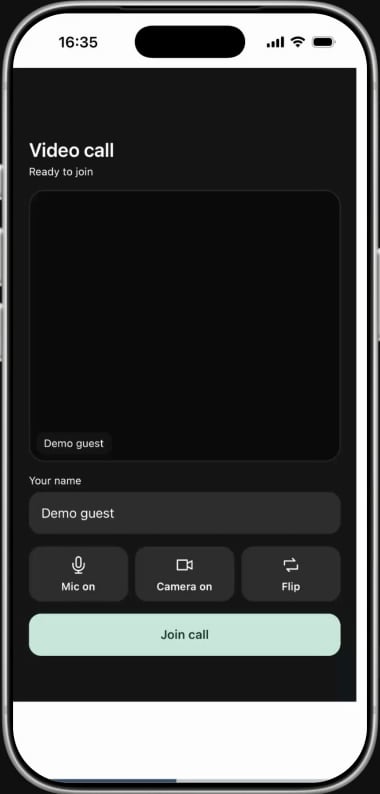
1. Allow camera and microphone access if asked. Wait for **Ready to join**.
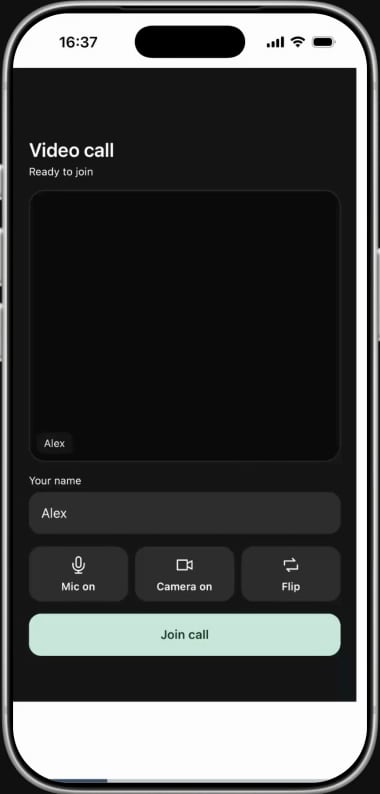
2. Under **Your name**, replace `Demo guest` with `Alex`.
3. Dismiss the keyboard so you can see **Join call**.
The local camera preview is black in this simulator setup, even with the camera on. The other caller's video can still appear.
### 3. Join the call
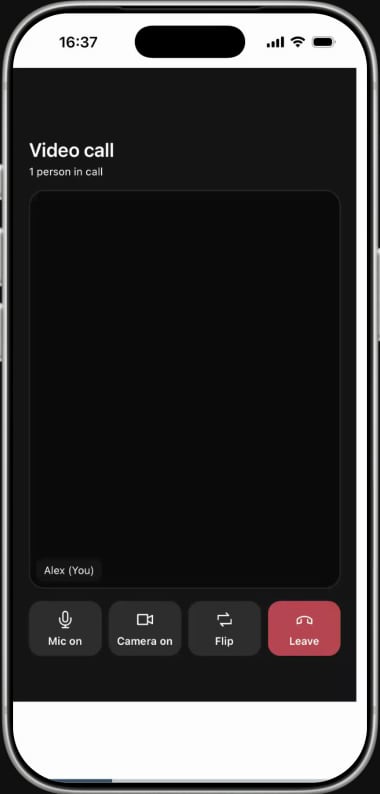
Tap **Join call**. Check that you see **1 person in call** and a red **Leave** button.
### 4. Add a second caller
1. Keep the first caller in the call. Open the same Daily room URL in another browser or on another device.
2. Allow camera and microphone access. Enter a different name, such as `Test`.
3. Choose **Join** or **Join meeting**, as shown by that client.
4. On the native call screen, check for **2 people in call** and the other caller's video.
The simulator's small **You** tile may stay black. It shows your local preview, not the other caller's video.
### 5. Use the controls and leave
The microphone and camera controls sit below the video. They control **your** microphone and camera. Turning your camera off does not hide the other caller's video.
Tap **Leave** when you're done. If you see **You left the call**, tap **Restart preview** to try again. Some builds return straight to **Ready to join**.
To test audio, speak and listen from both devices. A participant count alone does not confirm that audio works.
## Try it on your phone
You need a Bubble plan with Dev build access, such as a paid mobile plan or an eligible Agency plan. Check your account's build access first.
1. In the simulator preview, open **Preview on your phone → Create a dev build**.
2. Follow Bubble's build and installation steps. Include the bundle's native libraries and clear camera and microphone permission text.
3. Install the Dev build on your phone. Sign in if asked and select your development branch.
4. Open the call screen and allow camera and microphone access.
5. Join from another device. Test video and audio in both directions, then leave.
Use a Dev build for this check. A browser preview or BubbleGo alone cannot test the bundle's native libraries.
See [Bubble's mobile preview and Dev build guide](https://manual.bubble.io/help-guides/previewing-your-app/previewing-a-mobile-app#dev-build) for store connections and build delivery.
## Optional: create rooms from Bubble workflows
Use a workflow if each call needs its own room.
1. In the plugin's **API Key** setting, enter `Bearer ` followed by your Daily API key. Keep this key on the server.
2. Run the bundle's **Create room** action on the server. Choose **public** or **private** access.
3. Save the returned **URL** on your session or appointment record.
4. Pass that URL to the call screen and use it as **Daily room URL**. Create the room before the preview starts.
If the mobile workflow does not list **Create room**, use a backend workflow. Check the user's access before creating the room. Never send the Daily API key to the app or put it in an element field.
See the [Create room action reference](/bubble/daily/plugin-reference/actions/create-room) and [Daily room API reference](https://docs.daily.co/reference/rest-api/rooms/create-room).
## Optional: use a private room
The video uses a public room without a token. For a private room:
1. Create a private Daily room. Save its name and full URL.
2. Check that the user can access the call. Create a meeting token on the server for that **Room Name**.
3. Set **Expires (Unix Timestamp)**. Turn **Is Owner** on only for users who need owner access.
4. Pass the returned **Token** to the element's **Meeting token** field. Use the same room's URL in **Daily room URL**.
5. Test a valid token, an expired token and a token for a different room.
Keep the token separate from the room URL. Never use your Daily API key as a meeting token.
If the mobile workflow does not list **Create meeting token**, use a backend workflow that checks the user's access.
See the [Create meeting token action reference](/bubble/daily/plugin-reference/actions/create-meeting-token) and [Daily meeting-token API reference](https://docs.daily.co/reference/rest-api/meeting-tokens/create-meeting-token).
View our options for free community and priority support.
Post your feature request on our
idea board.
This documentation is built and hosted on [Mintlify](https://mintlify.com), a developer documentation platform.
 For more help, see [Daily's room setup guide](https://docs.daily.co/guides/products/prebuilt#step-by-step-guide-embed-daily-prebuilt) or our [Daily getting-started guide](/bubble/daily/getting-started).
## Build the native call screen
### 1. Add a mobile view and call element
1. In Bubble's mobile Design editor, open **App Manager → Add New Interface → Mobile view**.
2. Name the view `native_video_call_tutorial_v3`.
3. Choose **Not Scrollable**, then **Create**.
4. In **Visual Elements**, choose **Bundle - Daily Mobile Call**. Click the new view to place it.
5. Select the element to open its properties.
You can use another view name. Choose that same view when you set up the Home button below.
The video uses a testing copy of the bundle. Install the public bundle linked above in your own app.
For more help, see [Daily's room setup guide](https://docs.daily.co/guides/products/prebuilt#step-by-step-guide-embed-daily-prebuilt) or our [Daily getting-started guide](/bubble/daily/getting-started).
## Build the native call screen
### 1. Add a mobile view and call element
1. In Bubble's mobile Design editor, open **App Manager → Add New Interface → Mobile view**.
2. Name the view `native_video_call_tutorial_v3`.
3. Choose **Not Scrollable**, then **Create**.
4. In **Visual Elements**, choose **Bundle - Daily Mobile Call**. Click the new view to place it.
5. Select the element to open its properties.
You can use another view name. Choose that same view when you set up the Home button below.
The video uses a testing copy of the bundle. Install the public bundle linked above in your own app.
 ### 2. Set the element’s properties
Paste the URL you copied from Daily into **Daily room URL**. Use these settings for the public room:
| Property | Example |
| - | - |
| **Daily room URL** | The full HTTPS URL of your Daily room |
| **Meeting token** | Empty for this public-room example |
| **Display name** | `Demo guest` |
| **Call title** | `Video call` |
| **Start with microphone on** | On |
| **Start with camera on** | On |
The microphone and camera switches set the starting state. People can change them during a call.
You can also set **Background color**, **Join button color** and **Join button text color**. These are optional.
### 2. Set the element’s properties
Paste the URL you copied from Daily into **Daily room URL**. Use these settings for the public room:
| Property | Example |
| - | - |
| **Daily room URL** | The full HTTPS URL of your Daily room |
| **Meeting token** | Empty for this public-room example |
| **Display name** | `Demo guest` |
| **Call title** | `Video call` |
| **Start with microphone on** | On |
| **Start with camera on** | On |
The microphone and camera switches set the starting state. People can change them during a call.
You can also set **Background color**, **Join button color** and **Join button text color**. These are optional.
 ### 3. Add a Home button to open the call screen
1. Open **Home** in App Manager.
2. In **Visual Elements**, choose **Button**. Click the Home view to place it.
3. Set the button's label to **Open tutorial video call**.
4. Select the button's **Interaction** tab and click **Add workflow**.
5. Bubble creates **This element is tapped** and opens the action menu. Choose **Navigation → Go to view**.
6. Keep **Navigation type** set to **Stack**. Set **Target view** to `native_video_call_tutorial_v3`, or the view you created above.
7. Leave **Reset navigation stack** off. Wait for Bubble to show **Saved**.
You should now have one button, one tap event and one **Go to view** action. The action must point to your call screen.
### 3. Add a Home button to open the call screen
1. Open **Home** in App Manager.
2. In **Visual Elements**, choose **Button**. Click the Home view to place it.
3. Set the button's label to **Open tutorial video call**.
4. Select the button's **Interaction** tab and click **Add workflow**.
5. Bubble creates **This element is tapped** and opens the action menu. Choose **Navigation → Go to view**.
6. Keep **Navigation type** set to **Stack**. Set **Target view** to `native_video_call_tutorial_v3`, or the view you created above.
7. Leave **Reset navigation stack** off. Wait for Bubble to show **Saved**.
You should now have one button, one tap event and one **Go to view** action. The action must point to your call screen.
 ## Test a call in the simulator
### 1. Open the call screen
1. With **Home** open in the mobile editor, click **Preview**.
2. Select **Simulated device** and wait for it to load.
3. In the demo, tap **Tap to Start**. Sign in to Bubble if asked, then select the **test** branch.
4. On Home, tap **Open tutorial video call**. Check that your call screen opens.
Test the Home button you just built so you know its navigation works.
### 2. Check the pre-join screen
1. Allow camera and microphone access if asked. Wait for **Ready to join**.
2. Under **Your name**, replace `Demo guest` with `Alex`.
3. Dismiss the keyboard so you can see **Join call**.
The local camera preview is black in this simulator setup, even with the camera on. The other caller's video can still appear.
## Test a call in the simulator
### 1. Open the call screen
1. With **Home** open in the mobile editor, click **Preview**.
2. Select **Simulated device** and wait for it to load.
3. In the demo, tap **Tap to Start**. Sign in to Bubble if asked, then select the **test** branch.
4. On Home, tap **Open tutorial video call**. Check that your call screen opens.
Test the Home button you just built so you know its navigation works.
### 2. Check the pre-join screen
1. Allow camera and microphone access if asked. Wait for **Ready to join**.
2. Under **Your name**, replace `Demo guest` with `Alex`.
3. Dismiss the keyboard so you can see **Join call**.
The local camera preview is black in this simulator setup, even with the camera on. The other caller's video can still appear.
 ### 3. Join the call
Tap **Join call**. Check that you see **1 person in call** and a red **Leave** button.
### 3. Join the call
Tap **Join call**. Check that you see **1 person in call** and a red **Leave** button.
 ### 4. Add a second caller
1. Keep the first caller in the call. Open the same Daily room URL in another browser or on another device.
2. Allow camera and microphone access. Enter a different name, such as `Test`.
3. Choose **Join** or **Join meeting**, as shown by that client.
4. On the native call screen, check for **2 people in call** and the other caller's video.
The simulator's small **You** tile may stay black. It shows your local preview, not the other caller's video.
### 5. Use the controls and leave
The microphone and camera controls sit below the video. They control **your** microphone and camera. Turning your camera off does not hide the other caller's video.
Tap **Leave** when you're done. If you see **You left the call**, tap **Restart preview** to try again. Some builds return straight to **Ready to join**.
### 4. Add a second caller
1. Keep the first caller in the call. Open the same Daily room URL in another browser or on another device.
2. Allow camera and microphone access. Enter a different name, such as `Test`.
3. Choose **Join** or **Join meeting**, as shown by that client.
4. On the native call screen, check for **2 people in call** and the other caller's video.
The simulator's small **You** tile may stay black. It shows your local preview, not the other caller's video.
### 5. Use the controls and leave
The microphone and camera controls sit below the video. They control **your** microphone and camera. Turning your camera off does not hide the other caller's video.
Tap **Leave** when you're done. If you see **You left the call**, tap **Restart preview** to try again. Some builds return straight to **Ready to join**.
 To test audio, speak and listen from both devices. A participant count alone does not confirm that audio works.
## Try it on your phone
You need a Bubble plan with Dev build access, such as a paid mobile plan or an eligible Agency plan. Check your account's build access first.
1. In the simulator preview, open **Preview on your phone → Create a dev build**.
2. Follow Bubble's build and installation steps. Include the bundle's native libraries and clear camera and microphone permission text.
3. Install the Dev build on your phone. Sign in if asked and select your development branch.
4. Open the call screen and allow camera and microphone access.
5. Join from another device. Test video and audio in both directions, then leave.
Use a Dev build for this check. A browser preview or BubbleGo alone cannot test the bundle's native libraries.
See [Bubble's mobile preview and Dev build guide](https://manual.bubble.io/help-guides/previewing-your-app/previewing-a-mobile-app#dev-build) for store connections and build delivery.
## Optional: create rooms from Bubble workflows
Use a workflow if each call needs its own room.
1. In the plugin's **API Key** setting, enter `Bearer ` followed by your Daily API key. Keep this key on the server.
2. Run the bundle's **Create room** action on the server. Choose **public** or **private** access.
3. Save the returned **URL** on your session or appointment record.
4. Pass that URL to the call screen and use it as **Daily room URL**. Create the room before the preview starts.
If the mobile workflow does not list **Create room**, use a backend workflow. Check the user's access before creating the room. Never send the Daily API key to the app or put it in an element field.
See the [Create room action reference](/bubble/daily/plugin-reference/actions/create-room) and [Daily room API reference](https://docs.daily.co/reference/rest-api/rooms/create-room).
## Optional: use a private room
The video uses a public room without a token. For a private room:
1. Create a private Daily room. Save its name and full URL.
2. Check that the user can access the call. Create a meeting token on the server for that **Room Name**.
3. Set **Expires (Unix Timestamp)**. Turn **Is Owner** on only for users who need owner access.
4. Pass the returned **Token** to the element's **Meeting token** field. Use the same room's URL in **Daily room URL**.
5. Test a valid token, an expired token and a token for a different room.
Keep the token separate from the room URL. Never use your Daily API key as a meeting token.
If the mobile workflow does not list **Create meeting token**, use a backend workflow that checks the user's access.
See the [Create meeting token action reference](/bubble/daily/plugin-reference/actions/create-meeting-token) and [Daily meeting-token API reference](https://docs.daily.co/reference/rest-api/meeting-tokens/create-meeting-token).
To test audio, speak and listen from both devices. A participant count alone does not confirm that audio works.
## Try it on your phone
You need a Bubble plan with Dev build access, such as a paid mobile plan or an eligible Agency plan. Check your account's build access first.
1. In the simulator preview, open **Preview on your phone → Create a dev build**.
2. Follow Bubble's build and installation steps. Include the bundle's native libraries and clear camera and microphone permission text.
3. Install the Dev build on your phone. Sign in if asked and select your development branch.
4. Open the call screen and allow camera and microphone access.
5. Join from another device. Test video and audio in both directions, then leave.
Use a Dev build for this check. A browser preview or BubbleGo alone cannot test the bundle's native libraries.
See [Bubble's mobile preview and Dev build guide](https://manual.bubble.io/help-guides/previewing-your-app/previewing-a-mobile-app#dev-build) for store connections and build delivery.
## Optional: create rooms from Bubble workflows
Use a workflow if each call needs its own room.
1. In the plugin's **API Key** setting, enter `Bearer ` followed by your Daily API key. Keep this key on the server.
2. Run the bundle's **Create room** action on the server. Choose **public** or **private** access.
3. Save the returned **URL** on your session or appointment record.
4. Pass that URL to the call screen and use it as **Daily room URL**. Create the room before the preview starts.
If the mobile workflow does not list **Create room**, use a backend workflow. Check the user's access before creating the room. Never send the Daily API key to the app or put it in an element field.
See the [Create room action reference](/bubble/daily/plugin-reference/actions/create-room) and [Daily room API reference](https://docs.daily.co/reference/rest-api/rooms/create-room).
## Optional: use a private room
The video uses a public room without a token. For a private room:
1. Create a private Daily room. Save its name and full URL.
2. Check that the user can access the call. Create a meeting token on the server for that **Room Name**.
3. Set **Expires (Unix Timestamp)**. Turn **Is Owner** on only for users who need owner access.
4. Pass the returned **Token** to the element's **Meeting token** field. Use the same room's URL in **Daily room URL**.
5. Test a valid token, an expired token and a token for a different room.
Keep the token separate from the room URL. Never use your Daily API key as a meeting token.
If the mobile workflow does not list **Create meeting token**, use a backend workflow that checks the user's access.
See the [Create meeting token action reference](/bubble/daily/plugin-reference/actions/create-meeting-token) and [Daily meeting-token API reference](https://docs.daily.co/reference/rest-api/meeting-tokens/create-meeting-token).